
Frontend library
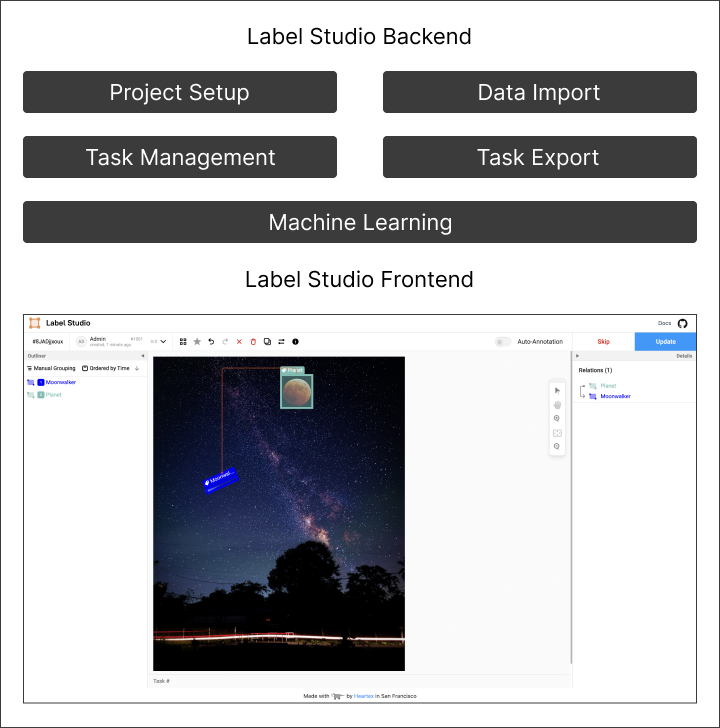
The Label Studio Frontend (LSF) is the main labeling interface distributed within Label Studio and as a separate package via NPM and Unpkg. You can integrate the LSF into your projects without Label Studio to provide data labeling capabilities to your users.
LSF can be customized and extended to fit your needs, and you can use a custom version of LSF standalone or in your LS installation. For more information see Custom LSF + LS integration.
LSF is located as a separate GitHub repository: https://github.com/heartexlabs/label-studio-frontend
Installation
There are two ways to install the LSF as follows:
- Using the package manager
- Using the Unpkg CDN
Using a package manager (recommended)
You can either use npm or yarn to install the LSF.
npm install heartexlabs@label-studio@latest --saveyarn add heartexlabs@label-studio@latestUsing Unpkg.com CDN
<!-- Include Label Studio stylesheet -->
<link href="https://unpkg.com/heartexlabs@label-studio@latest/build/static/css/main.css" rel="stylesheet">

<!-- Include the Label Studio library -->
<script src="https://unpkg.com/heartexlabs@label-studio@latest/build/static/js/main.js"></script>
Frontend integration guide
The LSF can be used with Vanilla JS or with the framework of your choice. The following examples cover basic integration with Vanilla and React.
Vanilla JS integration
You can use the Label Studio Frontend separately in your own projects by including it in your HTML page. Instantiate a new Label Studio object with a selector for the div that should become the editor.
To see all the available options for the initialization of LabelStudio object, see the Label Studio Frontend.
Using modern JS techniques (recommended)
Using modern JS techniques (recommended)
This guide assumes that you’re using a bundler like Webpack or Rollup to assemble your JS bundles, and LSF is installed via a package manager.
In your HTML add the following code:
<div id="label-studio"></div>Now to initialize the Label Studio Frontend, add the following code to your JS file:
import LabelStudio from 'heartexlabs@label-studio@latest';
import 'heartexlabs@label-studio@latest/build/static/css/main.css';

const labelStudio = new LabelStudio('label-studio', {
  config: `
    <View>
      <Image name="img" value="$image"></Image>
      <RectangleLabels name="tag" toName="img">
        <Label value="Hello"></Label>
        <Label value="World"></Label>
      </RectangleLabels>
    </View>
  `,
  interfaces: [
    "panel",
    "update",
    "controls",
    "side-column",
    "annotations:menu",
    "annotations:add-new",
    "annotations:delete",
    "predictions:menu"
  ],
  user: {
    pk: 1,
    firstName: "James",
    lastName: "Dean"
  },
  task: {
    annotations: [],
    predictions: [],
    id: 1,
    data: {
      image: "https://htx-misc.s3.amazonaws.com/opensource/label-studio/examples/images/nick-owuor-astro-nic-visuals-wDifg5xc9Z4-unsplash.jpg"
    }
  }
});

labelStudio.on("labelStudioLoad", (LS) => {
  // Perform an action when Label Studio is loaded
  const c = LS.annotationStore.addAnnotation({
    userGenerate: true
  });
  LS.annotationStore.selectAnnotation(c.id);
});

labelStudio.on("submitAnnotation", (LS, annotation) => {
  // Retrive an annotation in JSON format
  console.log(annotation.serializeAnnotation())
});
Using plain HTML and JS
Using plain HTML and JS
This technique is useful if you’re not using a bundler or if you want to use the LSF in a static HTML page.
<!-- Include Label Studio stylesheet -->
<link href="https://unpkg.com/heartexlabs@label-studio@latest/build/static/css/main.css" rel="stylesheet">

<div id="label-studio"></div>

<!-- Include the Label Studio library -->
<script src="https://unpkg.com/heartexlabs@label-studio@latest/build/static/js/main.js"></script>

<script>
const root = document.querySelector('#label-studio');
const labelStudio = new LabelStudio(root, {
  // all configuration options are the same
});
</script>
React integration
LSF is flexible and can be used with a framework of choice. This guide covers the React integration but the same principles can be applied to other frameworks.
LSF with React
Prepare new custom component:
// components/LabelStudio.js
import {useRef} from 'react';

const LabelStudioReact = (props) => {
  const labelStudioContainerRef = useRef();
  const labelStudioRef = useRef();

  useEffect(() => {
    if (labelStudioContainerRef.current) {
      labelStudioRef.current = new LabelStudio(
        labelStudioContainerRef.current,
        props
      );
    }
  }, []);

  return (
    <div
      id="label-studio"
      ref={function(el) {
        labelStudioContainerRef.current = el
      }}
    />
  );
}
Use the component in your React application
// App.js
import { render } from 'react-dom';
import LabelStudioReact from './components/LabelStudio';

const labelinConfig = `
  <View>
    <Image name="img" value="$image"></Image>
    <RectangleLabels name="tag" toName="img">
      <Label value="Hello"></Label>
      <Label value="World"></Label>
    </RectangleLabels>
  </View>
`

const task = {
  annotations: [],
  predictions: [],
  id: 1,
  data: {
    image: "https://htx-misc.s3.amazonaws.com/opensource/label-studio/examples/images/nick-owuor-astro-nic-visuals-wDifg5xc9Z4-unsplash.jpg"
  }
}

const App = () => {
  return (
    <div class="app-root">
      <LabelStudioReact
        config={labelinConfig}
        task={task}
        interfaces={[
          "panel",
          "update",
          "controls",
          "side-column",
          "annotations:menu",
          "annotations:add-new",
          "annotations:delete",
          "predictions:menu"
        ]}
        user={{
          pk: 1,
          firstName: "James",
          lastName: "Dean"
        }}
      />
    </div>
  )
}

render(<App />, document.getElementById('root'));
Frontend development
Refer to the Frontend Reference when developing with Label Studio Frontend.
Manual builds
If you want to build a new tag or change the behaviour of default components inside of LSF, then you need to go into the LSF repo and review the Development part of the README file. Making any changes requires that you have a good knowledge of React and Javascript.build.js
GitHub Artifacts
Use GitHub Artifacts to download a zip-formatted archive with LSF builds. Branches from the official LSF repo are built automatically and hosted on GitHub Artifacts.
See the GitHub Actions for the LSF repository to access them.
You can also configure a GitHub token to obtain artifacts automatically:
export GITHUB_TOKEN=<token>
cd label-studio/frontend
yarn download:lsf <branch-name-from-official-lsf-repo>
Custom LSF in Label Studio
LS Frontend (LSF) with Backend (LSB) integration is similar what is described in the Frontend integration guide. The Javascript integration script is placed in lsf-sdk.js in the Label Studio Backend. The main idea of this integration based on LSF callbacks.
Check out a quick guide on how to use custom LSF in Label Studio.
Prepare a custom LSF build
- Make your custom LSF build by following these instructions.
- Finalize your development with
npm run build:moduleto generatemain.cssandmain.jsfiles. - Confirm files appearance in the
build/staticfolder.
Integrate LSF into Label Studio
All frontend-related files are stored under label-studio/frontend directory. You will also find dist/ folder there that contains the latest builds of the external frontend libraries.
Under dist/ folder locate the lsf/ folder and replace its contents with your custom LSF build.
Inside every folder under
dist/you will find aversion.jsonfile. Do not modify or remove it. Its presence is required for the Label Studio to operate.
Do not forget to remove the old build from LSB:
rm -rf label-studio/label_studio/frontend/dist/lsf/{js,css}Copy build folder from LSF to LS:
cp -r label-studio-frontend/build/static/{js,css} label-studio/label_studio/frontend/dist/lsf/If you installed LS as a pip package, replace
<env-path>/lib/python<version>/site-packages/label_studio/frontend/dist/lsf/Run the LS instance as usual. It is now uses the new LSF build:
label-studio start <your-project>

If you found an error, you can file an issue on GitHub!